
Seperti halnya DNS kita bisa membuat primary-slave untuk database server , semisal server utama mati server cadangan bisa menghandle request dari aplikasi
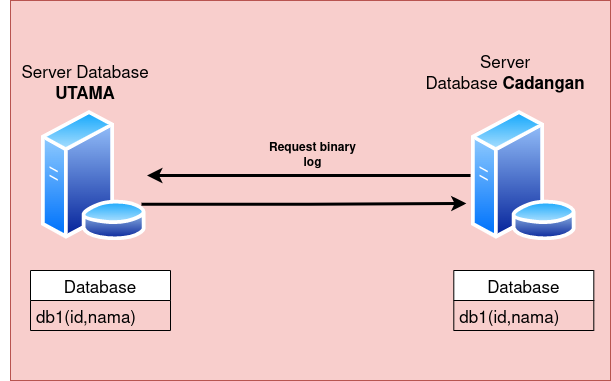
Untuk LAB kali ini saya gunakan 2 node dengan keterangan sebagai berikut:
- Server Utama : 172.23.0.62
- Server Cadangan: 172.23.0.63
Untuk database saya buat 1 database bernama db1, dengan isi tabel user, dengan kolom id dan nama
Konfigurasi Server Utama
Install MariaDB
yum install mariadb mariadb-server -ySetelah itu konfigurasi password untuk user root
mysql_secure_installation

NOTE: RUNNING ALL PARTS OF THIS SCRIPT IS RECOMMENDED FOR ALL MariaDB
      SERVERS IN PRODUCTION USE!  PLEASE READ EACH STEP CAREFULLY!

In order to log into MariaDB to secure it, we'll need the current
password for the root user.  If you've just installed MariaDB, and
you haven't set the root password yet, the password will be blank,
so you should just press enter here.

Enter current password for root (enter for none):
OK, successfully used password, moving on...

Setting the root password ensures that nobody can log into the MariaDB
root user without the proper authorisation.

Set root password? [Y/n] Y
New password: IsiPasswordKalian
Re-enter new password: IsiPasswordKalian
Password updated successfully!
Reloading privilege tables..
 ... Success!


By default, a MariaDB installation has an anonymous user, allowing anyone
to log into MariaDB without having to have a user account created for
them.  This is intended only for testing, and to make the installation
go a bit smoother.  You should remove them before moving into a
production environment.

Remove anonymous users? [Y/n] Y
 ... Success!

Normally, root should only be allowed to connect from 'localhost'.  This
ensures that someone cannot guess at the root password from the network.

Disallow root login remotely? [Y/n] Y
 ... Success!

By default, MariaDB comes with a database named 'test' that anyone can
access.  This is also intended only for testing, and should be removed
before moving into a production environment.

Remove test database and access to it? [Y/n] Y
 - Dropping test database...
 ... Success!
 - Removing privileges on test database...
 ... Success!

Reloading the privilege tables will ensure that all changes made so far
will take effect immediately.

Reload privilege tables now? [Y/n] Y
 ... Success!

Cleaning up...

All done!  If you've completed all of the above steps, your MariaDB
installation should now be secure.

Thanks for using MariaDB!
Setelah itu kita konfigurasi server_id dan log-bin.
Tambahkan baris seperti di bawah ini
vim /etc/my.cnf.d/mariadb-server.cnf
.....
##Definisikan server_id harus unik
server_id=1
##Definisikan log-bin
log-bin=mysql-bin
.....
Setelah itu simpan dan restart layanan MariaDB
systemctl restart mariadbSelanjutnya masuk ke konsol MariaDB, Buat database dan kita konfigurasi agar mengizinkan replikasi database.
untuk user dan password sesuaikan dengan keinginan.
mysql -u root -p
.....
MariaDB [(none)]> create database db1;
Query OK, 1 row affected (0.001 sec)
MariaDB [(none)]> create table db1.user (id int, nama varchar(50));
Query OK, 0 rows affected (0.034 sec)

MariaDB [(none)]> insert into db1.user (id,nama) values ("1", "Arya Pramudika");
Query OK, 1 row affected (0.005 sec)

MariaDB [(none)]> select * from db1.user;
+------+----------------+
| id   | nama           |
+------+----------------+
|    1 | Arya Pramudika |
+------+----------------+
1 row in set (0.001 sec)

MariaDB [(none)]> grant replication slave on *.* to admin@'%' identified by 'PasswordPalingAman';
Query OK, 0 rows affected (0.00 sec)

MariaDB [(none)]> flush privileges;
Query OK, 0 rows affected (0.00 sec)

MariaDB [(none)]> exit
Bye
.....
Konfigurasi di Server Cadangan
Lakukan installasi dan set password untuk root seperti di server utama, kemudian konfigurasi server-id dan log-bin nya
vim /etc/my.cnf.d/mariadb-server.cnf
.....
##Definisikan server_id harus unik
server_id=2
##Definisikan log-bin
log-bin=mysql-bin
.....
Lalu lakukan restart layanan MariaDB
systemctl restart mariadbSelanjutnya buat dump-database dari server utama, kemudian transfer ke server cadangan.
#Buat direktori untuk data, kemudian backup dengan perintah mariabackup

mkdir ~/mdb-data
mariabackup --backup --target-dir ~/mdb-data -u root -pPasswordPalingAman

[00] 2022-06-29 03:38:51 Connecting to MySQL server host: localhost, user: root, password: set, port: not set, socket: not set
[00] 2022-06-29 03:38:51 Using server version 10.3.28-MariaDB-log
mariabackup based on MariaDB server 10.3.28-MariaDB Linux (x86_64)
[00] 2022-06-29 03:38:51 uses posix_fadvise().
[00] 2022-06-29 03:38:51 cd to /var/lib/mysql/
.........
[00] 2022-06-29 03:38:53 Redo log (from LSN 1644664 to 1644673) was copied.
[00] 2022-06-29 03:38:54 completed OK!
Selanjutnya transfer direktori ke server cadangan, disini saya menggunakan scp. Disini saya memakai user root dan meletakkan folder tadi ke home user root
scp -r ~/mdb-data root@ipservercadangan:/root/Konfigurasi dump-dataabse di server cadangan
Kita berhentikan dulu layanan MariaDB
systemctl stop mariadbKemudian hapus data yang ada
rm -rf /var/lib/mysql/*Lalu kita jalankan prepare test sebelum melakukan restore: jika OK maka restore data akan berhasil
mariabackup --prepare --target-dir /root/mdb-data

mariabackup based on MariaDB server 10.5.9-MariaDB Linux (x86_64)
[00] 2022-06-29 03:03:01 cd to /root/mdb-data/
[00] 2022-06-29 03:03:01 open files limit requested 0, set to 1024
[00] 2022-06-29 03:03:01 This target seems to be not prepared yet.
[00] 2022-06-29 03:03:01 mariabackup: using the following InnoDB configuration for recovery:
.....
.....
2022-06-29  3:03:01 0 [Note] InnoDB: Starting crash recovery from checkpoint LSN=47610,47610
[00] 2022-06-29 03:03:01 Last binlog file , position 0
[00] 2022-06-29 03:03:01 completed OK!
Langsung saja kita restore file databasenya
mariabackup --copy-back --target-dir /root/mdb-data

mariabackup based on MariaDB server 10.5.9-MariaDB Linux (x86_64)
[01] 2022-06-29 03:03:32 Copying ibdata1 to /var/lib/mysql/ibdata1
[01] 2022-06-29 03:03:32         ...done
[01] 2022-06-29 03:03:32 Copying ./mysql/innodb_table_stats.ibd to /var/lib/mysql/mysql/innodb_table_stats.ibd
[01] 2022-06-29 03:03:32         ...done
.....
.....
[01] 2022-06-29 03:03:32 Copying ./xtrabackup_info to /var/lib/mysql/xtrabackup_info
[01] 2022-06-29 03:03:32         ...done
[00] 2022-06-29 03:03:32 completed OK!
Selanjutnya kita ubah owner dan group dari direktori /var/lib/mysql
chown -R mysql. /var/lib/mysqlLalu kita jalankan layanan MariaDB
systemctl start mariadbKita konfirmasi nomor dari master log, nomor ini sangat penting untuk replikasi antara server utama dan server cadangan
cat /root/mdb-data/xtrabackup_binlog_info

mysql-bin.000001	3708	0-1-19
Konfigurasi Replikasi
Masuk ke konsol MariaDB
mysql -u root -p

# Penjelasan
# master_host=(IP Address server utama)
# master_user=(User untuk replikasi)
# master_password=(Pasword user replikasi)
# master_log_file=(Nama file log)
# master_log_pos=(Nomor log)

MariaDB [(none)]> change master to
master_host='172.23.0.62',
master_user='admin',
master_password='PasswordPalingAman',
master_log_file='mysql-bin.000001',
master_log_pos=3708;
Query OK, 0 rows affected (0.191 sec)

#Menjalankan replikasi
MariaDB [(none)]> start slave;
Query OK, 0 rows affected (0.00 sec)

# Melihat status
MariaDB [(none)]> show slave status\G;
*************************** 1. row ***************************
                Slave_IO_State: Waiting for master to send event
                   Master_Host: 172.23.0.62
                   Master_User: admin
                   Master_Port: 3306
                 Connect_Retry: 60
               Master_Log_File: mysql-bin.000001
           Read_Master_Log_Pos: 3708
                Relay_Log_File: mariadb-relay-bin.000004
                 Relay_Log_Pos: 2252
         Relay_Master_Log_File: mysql-bin.000001
              Slave_IO_Running: Yes
             Slave_SQL_Running: Yes
               Replicate_Do_DB:
           Replicate_Ignore_DB:
            Replicate_Do_Table:
        Replicate_Ignore_Table:
       Replicate_Wild_Do_Table:
   Replicate_Wild_Ignore_Table:
                    Last_Errno: 0
                    Last_Error:
                  Skip_Counter: 0
           Exec_Master_Log_Pos: 3708
               Relay_Log_Space: 2563
               Until_Condition: None
                Until_Log_File:
                 Until_Log_Pos: 0
            Master_SSL_Allowed: No
            Master_SSL_CA_File:
            Master_SSL_CA_Path:
               Master_SSL_Cert:
             Master_SSL_Cipher:
                Master_SSL_Key:
         Seconds_Behind_Master: 0
 Master_SSL_Verify_Server_Cert: No
                 Last_IO_Errno: 0
                 Last_IO_Error:
                Last_SQL_Errno: 0
                Last_SQL_Error:
   Replicate_Ignore_Server_Ids:
              Master_Server_Id: 1
                Master_SSL_Crl:
            Master_SSL_Crlpath:
                    Using_Gtid: No
                   Gtid_IO_Pos:
       Replicate_Do_Domain_Ids:
   Replicate_Ignore_Domain_Ids:
                 Parallel_Mode: conservative
                     SQL_Delay: 0
           SQL_Remaining_Delay: NULL
       Slave_SQL_Running_State: Slave has read all relay log; waiting for the slave I/O thread to update it
              Slave_DDL_Groups: 3
Slave_Non_Transactional_Groups: 4
    Slave_Transactional_Groups: 2
Untuk pengujian coba kita insert data di server utama, di server cadangan otomatis akan mendapatkan data yang sama seperti di server utama
Be First to Comment